Reaper class
- Preparation
- Session setup: preferences, and saving the session
- The actions list
- Adding tracks, adding items
- Cut/copy/paste
- Previewing Sounds
- Stretching samples (for music only)
- Removing a Time selection from a session
- Removing background noise from a recording
- A suggested podcast-editing session template
Preparation
Things you’ll need:
-
Reaper installed on your computer
-
The extensions sws. Don’t install yet.
-
My config to be installed - instructions to follow. Here’s an in-depth tutorial if things don’t work - we’ll setup together.
-
The course sample pack or a folder containing some audio files.
Session setup: preferences, and saving the session
-
A tutorial about session setup
-
Before opening reaper, please place your recordings folder on your desktop, we’ll need it later.
Importing a configuration
- Open reaper. Once Reaper is installed, you’ll have to import the 200415 - AB Config.ReaperConfigZip file into reaper.
Here’s a download link to a more recent version of the config. I’m not very confident it’ll have everything you need, but it’s worth a shot.
-
Open up the preferences from the menu bar (
REAPER-settings) -
In the «
general» tab of the prefs, click this button and find the config file in your computer.
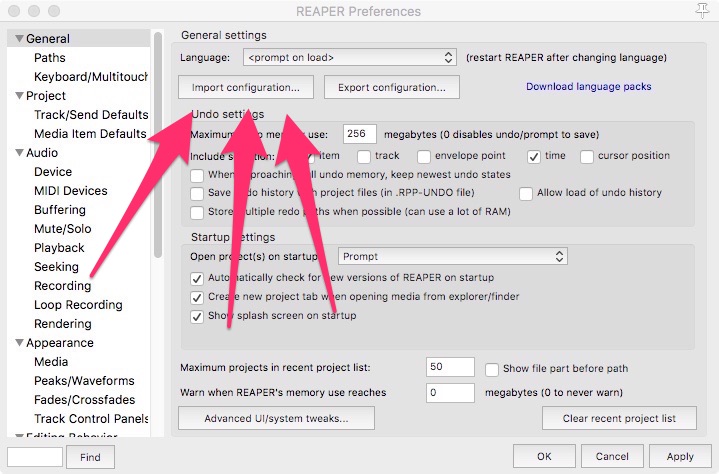
- At the bottom of that page, there is a search bar, which you’ll use for everything.
Peaks files for viewing waveforms
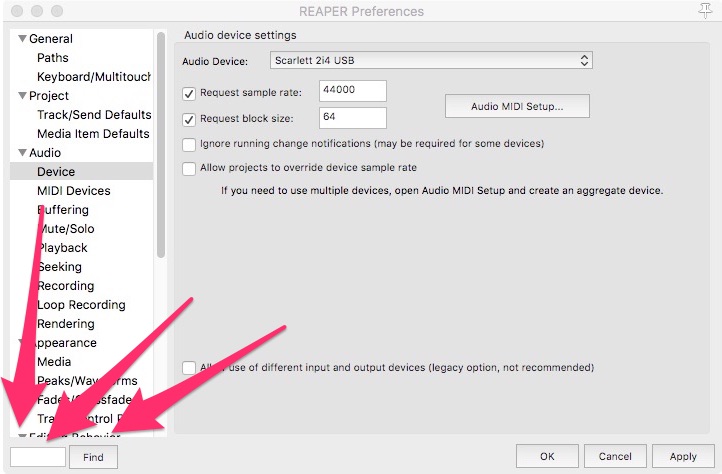
- type «
audio device setting» in the search bar, press find, and see what comes up. Type 44100 in the «request sample rate» block. Right below that, the block size can be set to 128 for now.
Where are the re-peaks stored ?
why keep all your peak files in a single folder
type «reapeaks» in the search bar. The search points to a folder. Select a different folder in your computer to store your peak files from there - the current preset one only exists in my computer, so you’ll have to setup your own. After that, you can close the preferences.
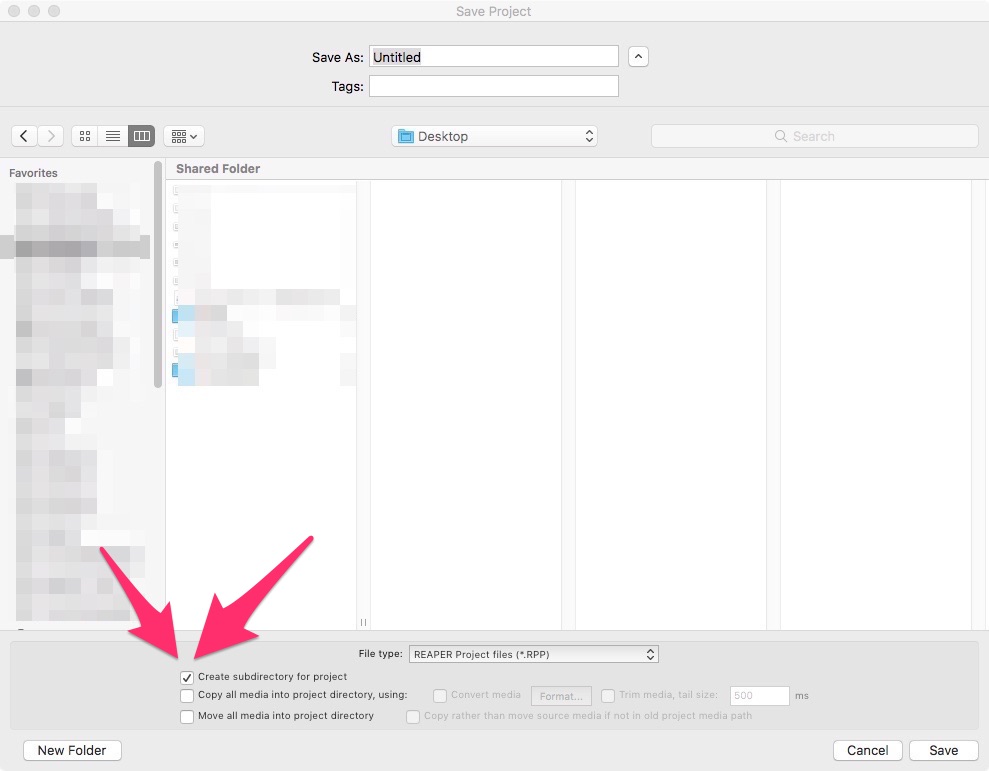
Session folder structure
The subject is worth knowing about, though you have everything pre-set here.
Hit cmd+s to save the session. Name it, and make sure to check the «create subdirectory» button - just to make sure your folder structure doesn’t go up the wazoo
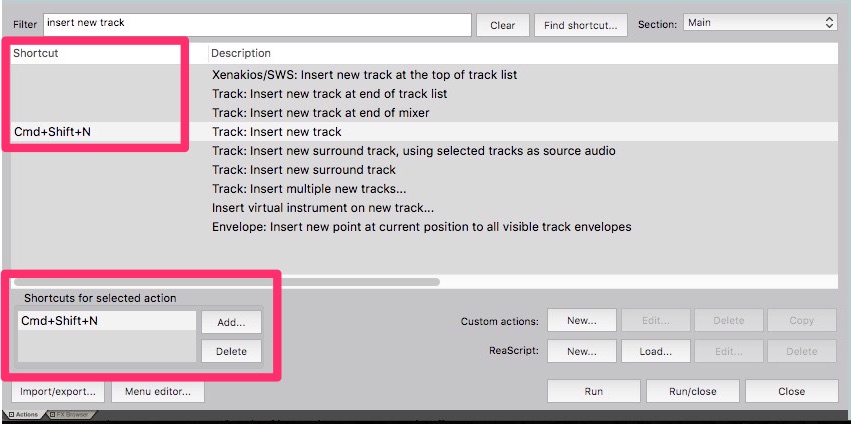
The actions list
your entry point to do anything, which you will use all the time.
- The action list’s tutorial here.
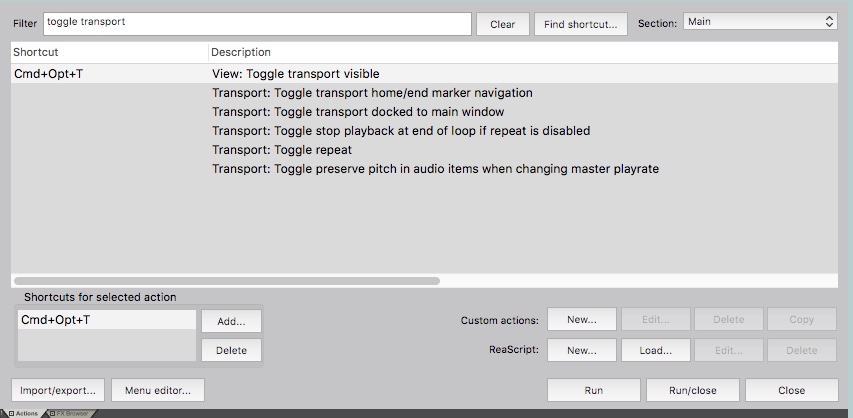
Press
cmd + a(or?if not using my config, or open from the menu bar’sActions=>show actions list). A window pops up at the bottom of the screen. At its top, there is a «filter» search bar. Type «toggle transport». The first option is the one you want to select. At the top of the screen, the transport section of the session should disappear, you can make it reappear by clicking a second time.
-
now type «
toggle master track visible» in the list and select the first option popping up - see what happens. -
now find «
Track : insert new track» in the list and see what happens. On the left of the action’s name, there is a part describing the current shortcuts for the actions. If it’s empty, feel free to add one.
Adding tracks, adding items
Putting together midi and audio items on the same track - how this software allows you to use both interchangeably.
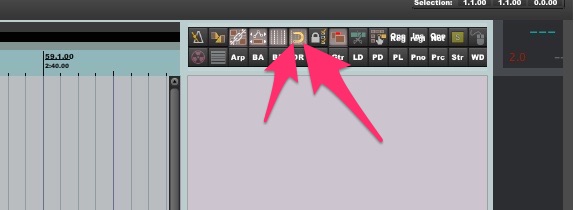
- At the top right of the page, make sure snap to grid is enabled by clicking on the magnet icon. If you can’t see the magnet icon, don’t panic, you can still proceed to the rest of the tutorial.
- In the track lane of the arrangement view, place your mouse cursor on the line that says 9.1.0. Click and drag while holding cmd and see what happens

A baby has appeared! This is called an item
- Now from the recordings pack that you have on the desktop, grab any audio file and drag it into the session up to bar 17.1.0, right next to the grey item you just created.
Cut/copy/paste
Cut, copy, and paste can be done from the mouse cursor, or edit cursor, or time selection - you’ll see soon enough «why» pasting at mouse cursor rather than edit cursor, its time gain and its downsides
-
Look up the shortcut for «
Adjust grid (mousewheel)» in the action list, and try it. Grid subdivision should be reducing itself. -
Look up the shortcut for «
fast horizontal zoom» in the action list, and try it. -
Now, with those shortcuts, set up a Grid size that is inferior to your items’ size, and zoom in to get them in sight.
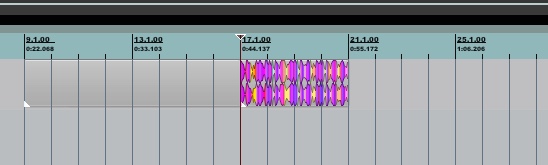
something like this
editing items using the custom shortcuts
if the following shortcuts don’t work upon trying them, don’t panic: you can set them in the actions list
- Place your mouse at bar 10, over your empty grey item, and press “a”.
- actions list:
CUSTOM - Trim Clip Right Side (mouse)
- actions list:
- Place your mouse at bar 18, over your audio item, and press “b”.
- actions list:
Custom: AB - PLUS Trim Clip Left Side (mouse)
- actions list:
- select the audio item, press c, place your mouse at bar 22 and press “v”.
- actions list:
Custom: AB - paste at mouse cursor
- actions list:
- press “
z” orctrl+zoractions: undoto undo anything at any point.- You might have to press z several times in a row for some of these actions
- In the action list, look up the name of the actions corresponding to these three shortcuts:
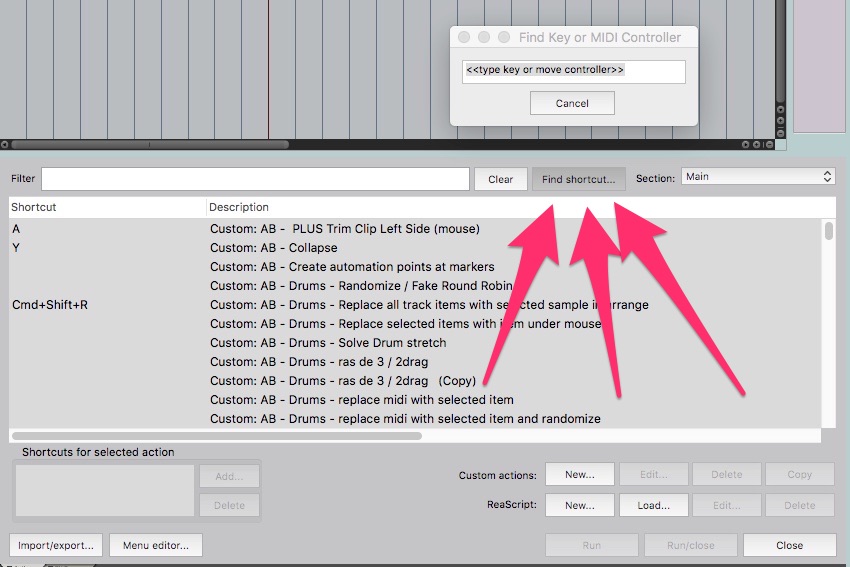
The thing to note:
these shortcuts apply only to whatever item is underneath the mouse. You can still run these actions at the edit cursor position instead (which is more traditional) by pressing ctrl + shortcut (a/s/b/v).
- Run the «
paste» action, but this time with a twist: press shift + v instead of just v. Look up the name of this shortcut in the action list. This is useful for beatmaking.
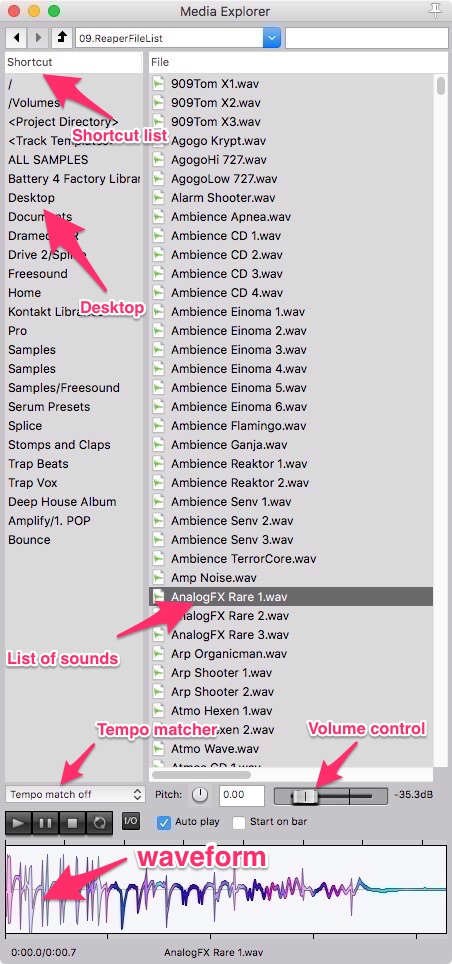
Previewing Sounds
- In the action list, search «
show media explorer». In the list of shortcuts that just appeared, find the desktop, double click it. In the now appearing desktop list, find the sample pack folder, and double click it. The list of sounds appears. Inside this list, any audio samples that you click will be played back from the bottom of the page.
Stretching samples (for music only)
- Drag a sample - any sample - into the session. Set the grid subdivision to be smaller than the length of the sample. With snap to grid enabled, place your mouse on one of the grid lines above the sample, and press shift + w. A little square appears on the item: that’s called a stretch marker.

-
Click and drag the stretch marker to the right or left in one grid increment. Reaper automatically adds other stretch markers at the extremities of the sample, stretches the sound, and maintains the same length with different play speeds - according to where the center marker is.
-
Click all three of the stretch markers while holding alt/option to remove them.
-
Place your mouse above the right or left extremity of the sample, and press alt/option. You should see your mouse cursor turning into a little hand. While holding alt, click the sample’s edge, and drag to the right.
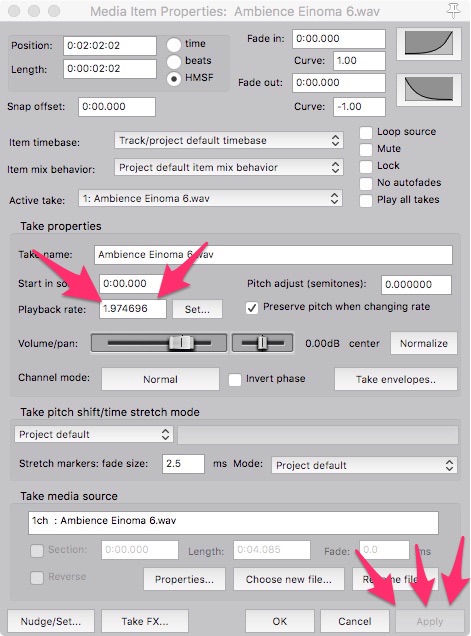
- You can always reset the length of the item to its original speed by following these steps:
- click the bottom half of the item
- In the window that pops up, find the box that says «
playrate» - Type the value
1 - press the «
apply button» at the bottom right of the window
- FIRST BEAT Once you are done previewing the samples, choose the ones you like, drag them into the session, and make a beat with them - a short one. Move, cut, copy, paste, or stretch them in any way you please.
Removing a Time selection from a session
- Place your edit cursor where you want the cut to begin
Ctrl-Clickand drag to create a time selection (highlighted area)- Open the actions list and search for:
Time selection: Remove contents of time selection (moving later items). - Reaper will remove that section and automatically close the gap

Alternative Methods
- Select an area and right-click and select
Cut selected area of items
- Select an area and right-click and select
- this doesn’t cut off time in the session, though.
- Ripple Edit:
- Enable “Ripple Edit” by clicking the ripple edit button (or search in actions list)
- Make your time selection
- Press Delete
- All content to the right will shift left to fill the gap
Removing background noise from a recording
Use the audio plugin ReaFIR to remove background noise.
Adding ReaFIR to Your Track
- Select the track you want to apply noise reduction to
- Click the FX button or press F
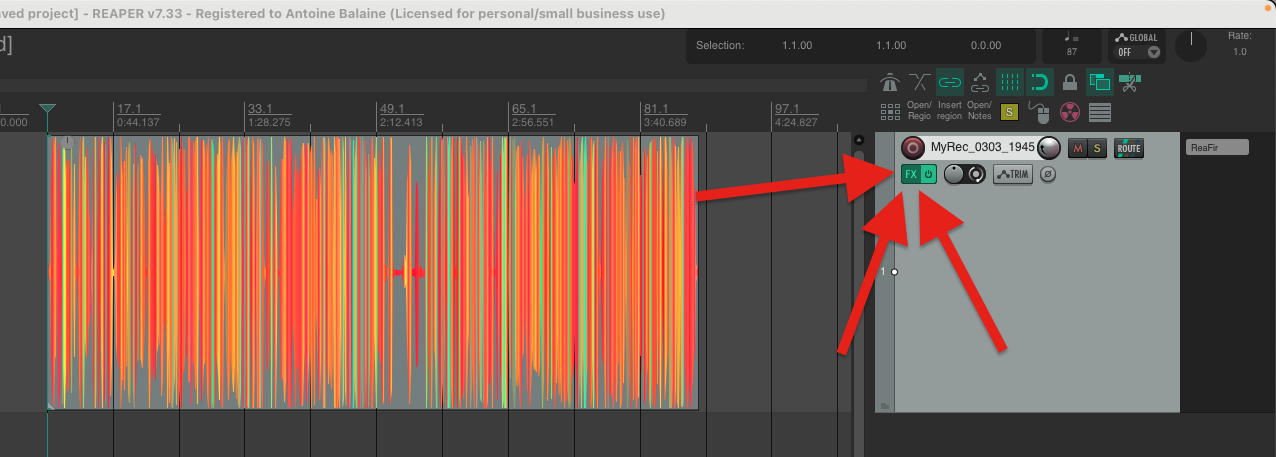
- In the FX browser, search for “ReaFIR”
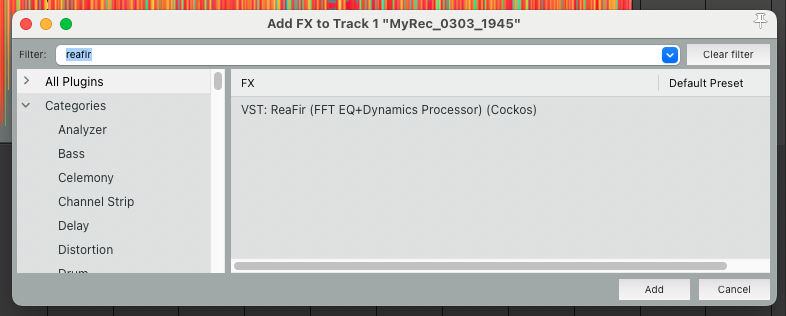
- Double-click on ReaFIR to add it to your track
Basic Noise Reduction
- Find a section of your recording that contains only the noise you want to remove
- Play this section and click the “Automatically build noise profile” button in ReaFIR
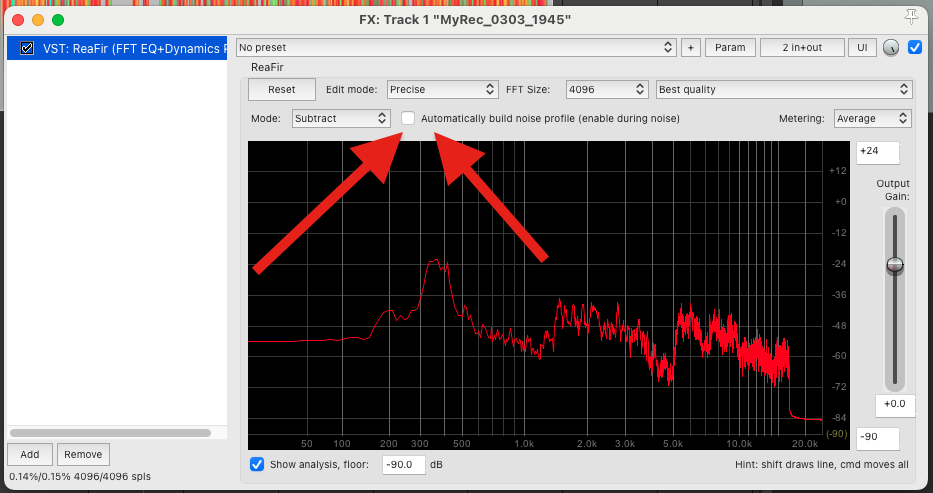
- Let it play for a few seconds to capture the noise pattern
- Click the button again to stop capturing
- Set the “
Mode” dropdown to “Subtract” - Adjust the “FFT size” slider if needed (higher values for more precision, lower for less latency)
 Make sure to watch til the end, please
Fine-Tuning
- Use the “Reduction amount” slider to control how aggressively the noise is removed
- If you hear artifacts or “underwater” effects, reduce the reduction amount
- To manually adjust the noise profile, disable “Automatically build noise profile” and drag points on the graph
- For more subtle noise reduction, try working with the lower frequencies first
Tips
- Always create a backup of your audio before processing
- Preview the audio before and after by toggling the FX bypass button
- For very specific noise issues, you can manually edit the noise profile by manipulating the curve on the graph
- Save your settings as a preset if you need to process multiple similar recordings
A suggested podcast-editing session template
How should my podcast editing session be structured?
Should I start by cutting off background noise, balancing levels between microphones, cutting off the ums… and ugh…s of hesitations of the interviewees and then move on to the editing of the session (cropping chunks, re-organizing the order of the questions)?
Here’s a very basic AUTO-GENERATED template structure for podcast editing:
1. Session Structure
Typical Track Layout, IF YOU ARE DOING MULTI-MICROPHONE RECORDINGS:
- Host Mic
- Guest Mic(s)
- Music/Intro/Outro
- Sound FX
- Reference/Guide Track (if needed)
In Reaper, Folder Tracks can help keep things tidy, especially if you have multiple guests or segments.
2. Editing Workflow
A. Prep & Cleanup
- Import all audio and line up the tracks.
- Group related items (e.g., host and guest mics for a segment).
- Noise Reduction:
- Use ReaFIR or a third-party plugin for gentle broadband noise reduction.
- Remove obvious background noise sections (coughs, bumps, etc.).
- Level Balancing:
- Use item volume handles or envelopes.
- Optionally, use a plugin like ReaComp or ReaEQ for basic tone/level matching.
B. Dialogue Editing
- Remove Filler Words:
- Cut out “um,” “uh,” long pauses, stutters, etc.
- Use ripple editing (Ripple Mode means «All Tracks») to keep everything in sync.
- Content Editing:
- Rearrange questions/answers if needed.
- Cut out tangents or off-topic sections.
- Use markers to note sections you might want to revisit.
Note about this specific topic:
The time-consuming tasks are here. I’m looking at ways to automate this process, I have the pieces scattered but I yet have to put it together.
It will involve: calling an online service to auto-generate subtitles. Since subtitles carry time-stamps, it will be possible to re-import the timestamps corresponding to the «filler words» as markers into the session. From there you can add automations to perform the cuts based on the marker positions.
For the content editing, we can also re-use the subtitle service, and feed it into another service that will generate markers with a note: «at T 00:10, this topic is discussed, at T 00:20, this other topic is discussed.». This should also make it easier to create a «table of contents» for your recording.
C. Putting it together
- Add Music/FX:
- Place intro/outro music, stingers, etc.
- Transitions:
- Crossfades for smooth edits.
- Duck music under dialogue as needed.
About crossfades:
Here’s an excellent tutorial about how to do them in reaper.
D. Final Polish
- Master Bus Processing:
- Light compression, EQ, and limiting for loudness consistency.
- Aim for -16 LUFS (mono) or -19 LUFS (stereo) for podcast standards.
- Export/Render:
- Render to WAV/MP3 as needed.
This is probably not going to be very relevant for a beginner podcaster, though.
Version Control & Experimentation
When it comes to saving multiple versions of a same project, there’s unfortunately not a single way of doing things, and different approaches will fit different needs. Either you
- create different regions in the session (horizontally represent alternates) or
- create multiple Major versions of your session file (move the versioning to the file system) or
- use markers and notes across multiple tracks (vertically represent alternates).
- use the
playlistfunction which allows previewing edits in a session - this is advanced, though.
Most podcasters use one session per episode, and do major revisions as “Save As” versions. This is unpractical, but it’s the least-worst option. Regions are used for marking segments (intro, main, outro) or alternate edits. Markers can be used for navigation and notes in a session. This is where it would be useful to auto-generate them, based on a transcription service.
Tips for Efficient Workflow
- Ripple Editing is your friend for dialogue editing.
- Color-code tracks and regions for quick visual reference.
- Use custom actions/scripts (there’s a lot of people who share automations online, though this is a rabbit hole for beginners because there are so many options).
- Templates: Build a podcast session template with your preferred routing, FX, and track layout.
Summary Table
| Task | Where/How in Reaper |
| Noise Reduction | Item FX or Track FX |
| Level Balancing | Item volume, envelopes, FX |
| Remove Filler Words | Ripple Editing, split/delete |
| Rearranging Content | Drag items, ripple mode |
| Alternate Edits | Regions, Save-As, Take Lanes |
| Version Control | Save-As, Regions, Markers |
| Final Mastering | Master FX chain, render |
In short:
- Start with cleanup and leveling, then dialogue editing, then assembly.
- Use Save-As for major versions, regions for alternate edits, and markers for navigation.
- Don’t be afraid to experiment—Reaper’s flexibility is perfect for podcasting!